
I knew when she booked a fitting for custom alterations that Domitille wanted puffy sleeves and her dress didn’t fit… but it wasn’t until her first fitting that I realized just how exciting working with her would be.
Domi’s wedding dress transformation is what I refer to as Semi-Custom Alterations, because her gown not only needed drastic work but we completely changed and redesigned whole parts of it – specifically the bodice and her fantastic couture sleeves.
When shopping for her wedding gown, Domi ultimately chose a dress she liked but wanted to transform and she did so largely because the shop suggested it. In fact, I often get asked why brides choose gowns that need a lot of work or changes. Usually it’s because a bride has a really clear vision of what they want and they either can’t find it or it’s not in their budget – or both. They’re also often encouraged to choose such gowns by boutiques or stylists, however this can often be a problem after purchasing if the shop can’t provide a skilled seamstress that’s able to do the work they suggested. Luckily for us, in spite of the store not knowing how to perform the alterations for Domi, she found and booked me online and I was able to work my magic!
Overall Adjustment Details
The drastic custom alterations work her dress needed? Well…her dress, the Hinson style from Watters Wtoo line, was about about 6 sizes too big. That’s not just a lot of work, there is so much reconstruction involved, some seamstresses won’t touch it. Personally though, I enjoy the challenge and construction required because I am a seamstress and a dressmaker; I don’t just love altering and perfecting dresses but I also enjoy making them.
And alongside needing her skirt hemmed and creating her custom sleeves, work like this requires multiple fittings – partially because some alterations need to be done before moving on to the next because one will affect the other and partially because some alterations can’t even be addressed until after the major changes are made first.
Her Bodice and skirt
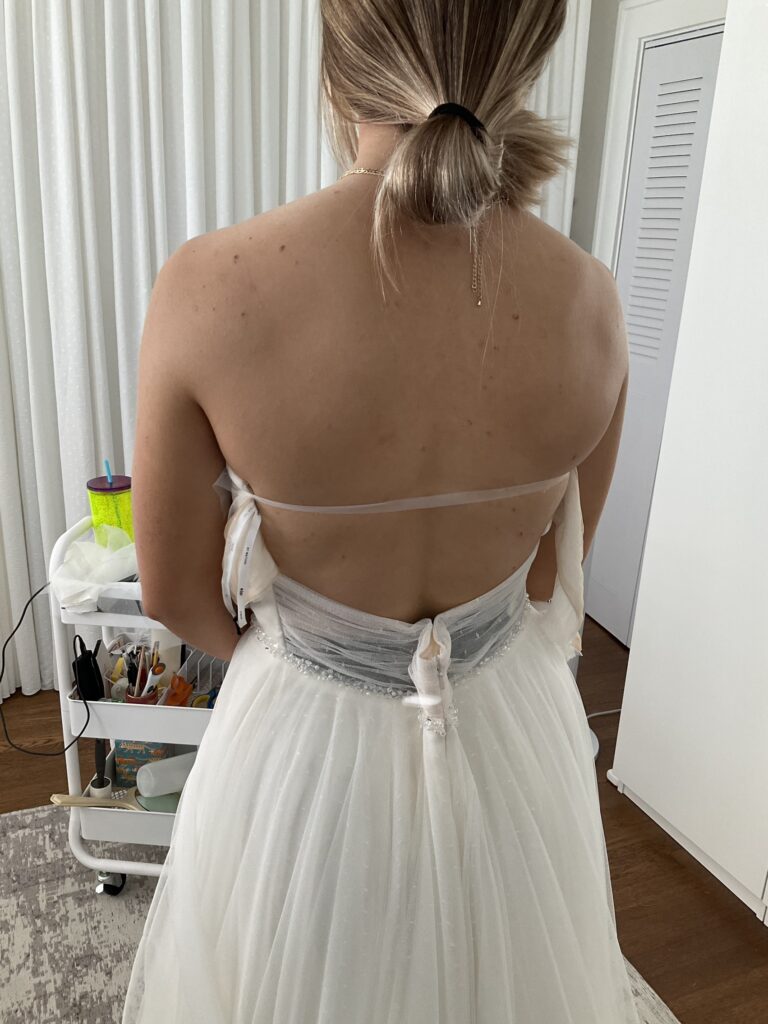
A summary of all the custom alterations and adjustments made: took in about 6-8 inches on bodice by removing fabric from front of all lower bodice under bust; had to completely reconstruct the back bodice pieces to create a more structured open back silhouette (and even added matching pleating from hem fabric remnants); took in princess seams and reshaped bust (including added vertical seam hidden underneath pleated layers); completely repositioned front bodice pleating after take in; replaced built in cups; and shortened overall bodice length to hit proper waistline. I also easily removed the beading for her as she requested. And her skirt needed to be hemmed and taken in at the waist at the side seams and zipper (which would be reset) in order to compensate for and match the new fit of the bodice.
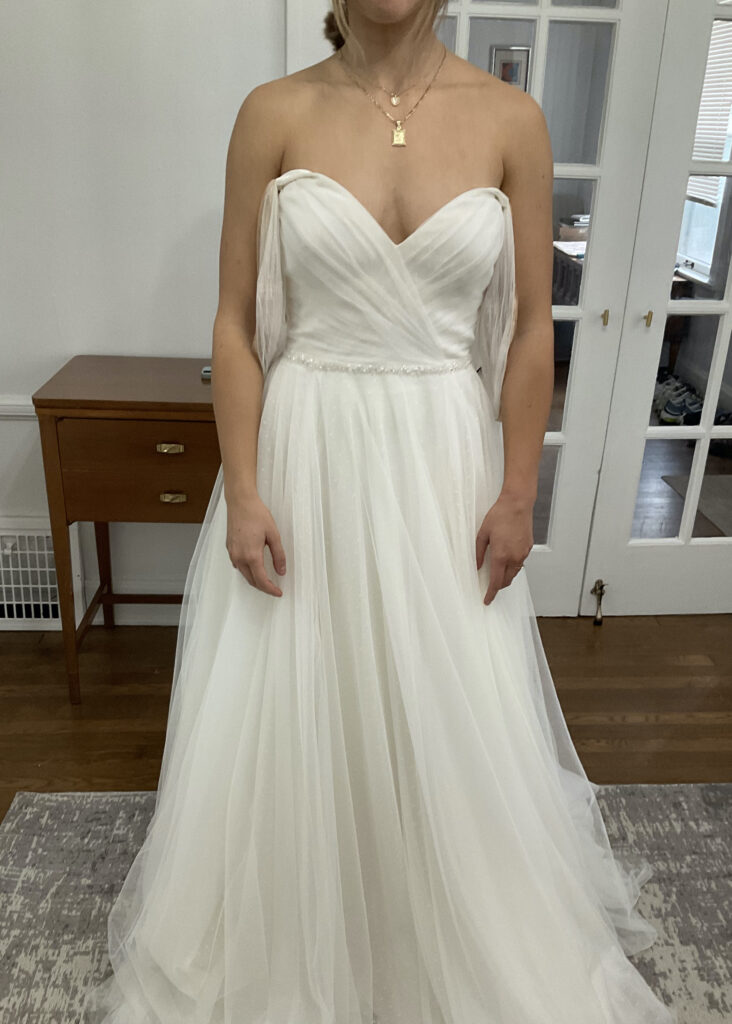
As you can see… I needed to alter and edit quite a bit. It is not a stretch at all to say that her dress was falling off of her.
To make this bodice not only fit and stay up, I had to add a bit more to the back and make sure it fit snug and firm on her waist so that there was no risk of falling down. And because she wanted the back open and the shoulders of the sleeves fairly offset, I let her know ahead of time that they would probably need a small piece of tape to stay in place on her shoulders. (And yes, I do approve of the guided use of tape, but only to keep a strap on a shoulder or to provide peace of mind with a neckline – NOT to ever try to hold anything “up.”)
Her chic and custom couture sleeves
When she first asked if I could create custom sleeves for her, Domi used the word renaissance so I honestly imagined something more billowy. But when she started showing me inspiration photos and we scrolled through Pinterest and Etsy, I quickly got excited envisioning what she wanted. I draped and pinned fabric to create a rough visual and then began to make quick sketches on my iPad so we could start to determine the final design – deciding everything from how many puffs to how much volume every area would have and even the type of cuff she preferred.


Fabric Selection
She wanted the sleeves to not be too bulky while still having as much volume as possible so with the sheer net and dotted layers on her dress I instantly knew the most complimentary and best structured choice of material would be organza. And I knew I would need to source it online in order to get a quality material that was the right color and was matte rather than shiny (the latter of which is annoyingly all you can ever find in typical stores).
As I suspected, I found several great options at Mood Fabrics. I got a few swatches in different fibers and bought a couple of yards of the two I suspected would be the best choices and color matches. (Extra bridal fabric will always come in handy at some point or another.) During her second fitting I went through the options with her and I was extra excited when she decided on the one I had begun to play around with and already loved.
Pattern Perfection
I’d not made a sleeve with quite so much volume as this one so I happily spent an entire day creating and testing the pattern. I was quickly falling in love with the design and doing this always helps me grow and refine my skills so I truly relish the time and development. When I brought out the toile (test draft) of a sleeve during the next fitting it was such a hit. It really did look so great already, and I was able to note a few changes to design and make adjustments on the fit.
The truly tedious part was what I will admit snuck up on me a bit: construction. Because, of course, once I made pattern adjustments and began constructing the actual sleeves out of the true fabric, my fanaticism for perfect seam finishes quickly altered my pace. Which is to say, testing and perfecting the comfort and look of the final, finished sleeve demanded meticulous attention.
Perfecting the Pattern
Thoughtful Comfort and Construction
First refinement I caught: the connecting seams of the puffs. Making each puff requires gathering fabric and because I wanted each to have a certain shape and volume, I made them separate pieces. So they not only needed a clean seam sewing them together since it’s an essentially sheer fabric. But I quickly found that the simplest way to gather the fabric was going to create an extra crisp and rough seam, making her sleeve extremely uncomfortable that would have left her with red rings on her arm from rubbing. I’m SO glad I had the foresight to catch this. However, it did mean that every seam had to be either a french seam or enclosed in bias tape. Which is seamstress speak for more than twice the work.
Meticulous Details
Second refinement I caught: the grain of the cuffs. The cuffs would essentially be a rectangle pressed in half ‘hot dog-style’ and sewn to the end of the sleeve. Well, I very quickly found myself joking that I went to start with the easiest, simplest, and quickest part of making the sleeve only to find that I had it completely backwards. But again, I’m grateful I had the insight to catch and resolve the issue; the organza was too stiff to fold on the grain, making a perfect crease impossible.
So I after testing I confirmed, this meant it needed to be made and sewn on the bias. This requires patterning on a 45 degree angle from the normal direction/grain of the fabric so that the weave is looser and more flexible, however that flex often demands the fabric be allowed to stretch. Sometimes you can do this after cutting, but with such a small piece that would naturally move and bend while wearing, I decided to pin, press, and stretch the bias pieces of material before cutting to ensure the cleanest crispest edge and symmetry.
I am so glad I invested all the effort in these little details. The edge of the cuff cut on the grain (left) versus the cuff cut on the bias (right), before even being sewn, doesn’t even come close. And this is exactly why having a skilled seamstress makes all the difference.

It’s the expertise and attention to such details that completely sets couture seamstress work apart.
The finished and beautiful couture Wedding Dress
So without further ado, the wonderful and incredible results that I could not have been more proud of. I was so thankful to have gotten to make something so chic. And every bit of joy from Domi and her family made my heart ridiculously full. She looked so beautiful and I am so glad to was able to wear the dress of her dreams.


Looking Completely stunning on her big day


*psst: Can we talk about this amazing range of motion achieved?!

Get beautiful results like Domi starting with booking your custom alterations fitting today.
wedding day photography by Bella Gala Photography


View comments
+ Leave a comment